
Day 25
Fun with Image Filters
by Michael Morrison
- The Basics of Color
- Color Images in Java
- Color Models
- The Color Model Classes
- Image Filters
- The Image Filter Classes
- Writing Your Own Image Filters
- Using Image Filters
- Summary
-
Q&A
As you learned both yesterday and earlier in this book, Java provides lots of neat ways to work with graphical images. One of Java's more interesting image-handling features is its support for image filters, which allow you to alter the individual pixels of an image according to a particular algorithm. Image filters can range from simple effects such as adjusting the brightness of an image to more advanced effects such as embossing.
At the heart of Java's graphics and imaging are Java color models. Today's lesson begins by looking into what a color model is, along with how color models affect image handling and Java graphics in general. You'll then move on to learn about Java image filters and how they are used to manipulate graphical images. Java provides a variety of image filter classes that interact together to form a framework for easily filtering graphical images. You can extend the standard Java image filtering classes and build your own image filters to perform just about any type of image processing you can imagine. You'll finish today's lesson by implementing your own image filters.
So today's lesson covers the following primary topics:
- The basics of color
- Color models
- Image filters
- Writing your own image filters
I think you'll find that image filters are a very interesting and powerful feature of Java that haven't received as much attention as they deserve. Granted, image filters don't share the wide applicability of some other aspects of Java, but they can be fun to tinker with and will inevitably be useful in some specialized applets.
The Basics of Color
Everything graphical in Java, including image filters, begins with the concept of color. I know, you've probably heard something about color before, but maybe not in the way I'm about to describe. You see, when I talk about the notion of color, I mean a computer's notion of color. In other words, I want to briefly take a look at how color is represented on a computer, since it will ultimately give you more insight into how image filters work.
Since modern computer environments are highly graphical, it is imperative that computers know how to process and display information in color. Although most computer operating systems have some degree of platform-dependent handling of color, they all share a common approach to the general representation of colors. Knowing that all data in a computer is ultimately stored in a binary form, it stands to reason that physical colors are somehow mapped to binary values, or numbers, in the computer domain. The question is, how are colors mapped to numbers?
One way to come up with numeric representations of colors would be to start at one end of the color spectrum and assign a number to each color until you reach the other end. This approach solves the problem of representing a color as a number, but it doesn't provide any way to handle the mixing of colors. As anyone who has experienced the joy of Play-Doh can tell you, colors react in different ways when combined with each other. The way colors mix to form other colors goes back to physics, which is a little beyond this discussion. The point is that a computer color system needs to be able to handle mixing colors with accurate, predictable results.
The best place to look for a solution to the color problem is a color computer monitor. A color monitor has three electron guns: red, green, and blue. The output from these three guns converge on each pixel of the screen, exciting phosphors to produce the appropriate color (see Figure 25.1). The combined intensities of each gun determine the resulting pixel color. This convergence of different colors from the monitor guns is very similar to the convergence of different colored Play-Doh. The primary difference is that monitors use only these three colors (red, green, and blue) to come up with every possible color that can be represented on a computer. (Actually, the biggest difference is that Play-Doh can't display high-resolution computer graphics, but that's another discussion.)
Figure 25.1 : Electron guns in a color monitor converging to create a unique color.
Knowing that monitors form unique colors by using varying intensities
of the colors red, green, and blue, you might be thinking that
a good solution to the color problem would be to provide an intensity
value for each of these primary colors. This is exactly how computers
model color. Computers represent different colors by combining
the numeric intensities of the primary colors red, green, and
blue. This color system is known as RGB (red, green, blue) and
is fully supported by Java.
| New Term |
RGB is the primary color system used by Java and stands for red, green, blue. |
Although RGB is the most popular computer color system in use,
there are others. Another popular color system is HSB, which stands
for hue, saturation, brightness. In this system, colors are defined
by varying degrees of hue, saturation, and brightness. The HSB
color system is also supported by Java.
| Note |
You already learned about Java's support for color on Day 9, "Graphics, Fonts, and Color." Just so you won't think I'm repeating what you've already learned, understand that this discussion of color is meant to lay more complete groundwork for the advanced issues of using color that are a big part of Java image filtering. |
Color Images in Java
Bitmapped color images are composed of pixels that describe the
colors at each location of an image. Each pixel in an image has
a specific color that is usually described using the RGB color
system. Java provides support for working with 32-bit images,
which means that each pixel in an image is described using 32
bits. The red, green, and blue components of a pixel's color are
stored in these 32 bits, along with an alpha component. The alpha
component of a pixel refers to the transparency or opaqueness
of the pixel.
| New Term |
A pixel is the smallest graphical component of an image and is assigned a particular color. |
| New Term |
The alpha component of a pixel refers to the transparency or opaqueness of the pixel. |
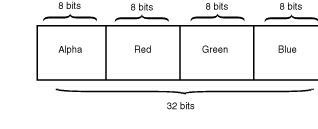
A 32-bit Java image pixel is therefore composed of red, green, blue, and alpha components. By default, these four components are packed into a 32-bit pixel value, as shown in Figure 25.2. Notice that each component is described by 8 bits (a byte), yielding possible values between 0 and 255 for each. These components are packed into the 32-bit pixel value from high-order byte to low-order byte in the following order: alpha, red, green, and blue. It is possible for the pixel components to be packed differently, but this is the default pixel storage method used in Java.
Figure 25.2 : The four components of a pixel in a 32-bit Java image.
A color component value of 0 means the component is absent, and a value of 255 means it is maxed out. If all three color components are 0, the resulting pixel color is black. Likewise, if all three components are 255, the color is white. If the red component is 255 and the others are 0, the resulting color is pure red.
The alpha component describes the transparency of a pixel, independent of the color components. An alpha value of 0 means a pixel is completely transparent (invisible), and an alpha value of 255 means a pixel is completely opaque. Values between 0 and 255 enable the background color to show through a pixel in varying degrees.
The color components of a Java image are encapsulated in a simple class called Color. The Color class is a member of the java.awt package and represents the three primary color components red, green, and blue. This class is useful because it provides a clean abstraction for representing color, along with useful methods for extracting and modifying the primary components. The Color class also contains predefined constant members representing many popular colors.
Color Models
In Java, pixel colors are managed through color models. Java color
models provide an important abstraction that enables Java to work
with images of different formats in a similar fashion. More specifically,
a color model is a Java object that provides methods for translating
from pixel values to the corresponding red, green, and blue color
components of an image. At first, this may seem like a trivial
chore, knowing that pixel color components are packed neatly into
a 32-bit value. However, there are different types of color models
reflecting different methods of maintaining pixel colors. The
two types of color models supported by Java are direct color models
and index color models.
| New Term |
A color model is an abstraction that provides a means to convert pixel color values to absolute colors. |
Color models are used extensively in the internal implementations of the various Java image processing classes. What does this mean to you, the ever-practical Java programmer? It means that by understanding color models you know a great deal about the internal workings of color in the Java graphics system. Without fully understanding color models and how they work, you would no doubt run into difficulties when trying to work with the advanced graphics and image-processing classes provided by Java.
Direct Color Models
Direct color models are based on the earlier description of pixels,
where each pixel contains specific color and alpha components.
Direct color models provide methods for translating these types
of pixels into their corresponding color and alpha components.
Typically, direct color models extract the appropriate components
from the 32-bit pixel value using bit masks.
| Technical Note |
A bit mask is a binary code used to extract specific bits out of a numeric value. The bits are extracted by bitwise ANDing the mask with the value. Masks themselves are typically specified in hexadecimal. For example, to mask out the low-order word of a 32-bit value, you use the mask 0x0000FFFF. |
Index Color Models
Index color models work differently than direct color models. In fact, index color models work with pixels containing completely different information than you've learned thus far. Pixels in an image using an index color model don't contain the alpha and RGB components like the pixels used in a direct color model. An index color model pixel contains an index into an array of fixed colors (see Figure 25.3). This array of colors is called a color map.
Figure 25.3 : An index color model pixel and its associated
color map.
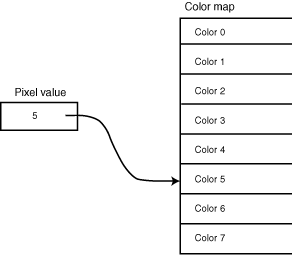
| New Term |
A color map is a list of colors referenced by an image using an index color model. Color maps are also sometimes referred to as palettes. |
An example of an image that uses an index color model is a 256-color image. 256-color images use 8 bits to describe each pixel, which doesn't leave much room for RGB components, let alone an alpha component. Rather than try to cram these components into 8 bits, 256-color pixels store an 8-bit index into a color map. The color map itself has 256 color entries that each contain RGB and alpha values describing a particular color.
Index color models provide methods for resolving pixels containing color map indexes into alpha, red, green, and blue components. Index color models handle looking up the index of a pixel in the color map and extracting the appropriate components from the color entry.
The Color Model Classes
Java provides standard classes for working with color models in the java.awt.image package. At the top of the hierarchy is the ColorModel class, which defines the core functionality required of all color models. The ColorModel class is an abstract class containing the basic support required to translate pixel values into alpha and color components. Two other classes are derived from ColorModel, representing the two types of color models supported by Java: DirectColorModel and IndexColorModel.
The DirectColorModel class is derived from ColorModel and provides specific support for direct color models. If you recall, pixels in a direct color model directly contain the alpha and color components in each pixel value.
The IndexColorModel class is also derived from ColorModel and provides support for index color models. Pixels in an index color model contain indexes into a fixed array of colors known as a color map, or palette. Even though the color model classes are important in understanding the conceptual side of Java graphics, you won't be using them directly when working with image filters, so there's no need to go into any more detail with them here.
Image Filters
Now it's time to move into the meat of today's lesson: image filters.
Image filtering is sometimes referred to as image processing.
Most popular graphical paint programs contain image-processing
features, such as sharpening or softening an image. Typically,
image processing programs involve the usage of complex libraries
of routines for manipulating images. Java provides a simple yet
powerful framework for manipulating images. In Java, image processing
objects are called image filters, and they serve as a way to abstract
the filtering of an image without worrying about the details associated
with the source or destination of the image data.
| New Term |
An image filter is an object that alters the individual pixels of an image according to a particular algorithm. |
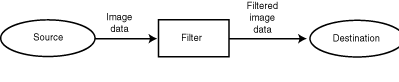
A Java image filter can be thought of quite literally as a filter into which all the data for an image must enter and exit on its way from a source to a destination. Take a look at Figure 25.4 to see how image data passes through an image filter.
Figure 25.4 : Image data passing through an image filter.
While passing through an image filter, the individual pixels of an image can be altered in any way as determined by the filter. By design, image filters are structured to be self-contained components. The image filter model supported by Java is based on three logical components: an image producer, an image filter, and an image consumer. The image producer makes the raw pixel data for an image available, the image filter in turn filters this data, and the resulting filtered image data is passed on to the image consumer where it has usually been requested. Figure 25.5 shows how these three components interact with each other.
Figure 25.5 : The relationship between an image producer,
an image filter, and an image consumer.
| New Term |
An image producer is an abstract data source that makes available raw pixel data for an image. |
| New Term |
An image consumer is an abstract data destination that receives raw pixel data from an image consumer. |
Breaking down the process of filtering images into these three components provides a very powerful object-oriented solution to a complex problem. Different types of image producers can be derived that are able to retrieve image data from a variety of image sources. Likewise, this organization allows filters to ignore the complexities associated with different image sources and focus on the details of manipulating the individual pixels of an image.
The Image Filter Classes
Java's support for image filters is scattered across several classes and interfaces. You don't necessarily have to understand all these classes in detail to work with image filters, but it is important that you understand what functionality they provide and where they fit into the scheme of things. Following are the Java classes and interfaces that provide support for image filtering:
- ImageProducer
- FilteredImageSource
- MemoryImageSource
- ImageConsumer
- PixelGrabber
- ImageFilter
- RGBImageFilter
- CropImageFilter
The ImageProducer interface describes the methods necessary to extract image pixel data from Image objects. Classes implementing the ImageProducer interface provide implementations of these methods specific to the image source they represent. For example, the MemoryImageSource class implements the ImageProducer interface and produces image pixels from an array of pixel values stored in memory.
The FilteredImageSource class implements the ImageProducer interface and produces filtered image data. The filtered image data produced is based on the image and the filter object passed in the FilteredImageSource class's constructor. FilteredImageSource provides a very simple way to apply image filters to Image objects.
The MemoryImageSource class implements the ImageProducer interface and produces image data based on an array of pixels in memory. This is very useful in cases where you need to build an Image object directly from data in memory.
The ImageConsumer interface describes methods necessary for an object to retrieve image data from an image producer. Objects implementing the ImageConsumer interface are attached to an image producer object when they are interested in its image data. The image producer object delivers the image data by calling methods defined by the ImageConsumer interface.
The PixelGrabber class implements the ImageConsumer interface and provides a way of retrieving a subset of the pixels in an image. A PixelGrabber object can be created based on either an Image object or an object implementing the ImageProducer interface. The constructor for PixelGrabber enables you to specify a rectangular section of the image data to be grabbed. This image data is then delivered by the image producer to the PixelGrabber object.
The ImageFilter class provides the basic functionality of an image filter that operates on image data being delivered from an image producer to an image consumer. ImageFilter objects are specifically designed to be used in conjunction with FilteredImageSource objects. The ImageFilter class is implemented as a null filter, which means that it passes image data unmodified. Nevertheless, it implements the overhead for processing the data in an image. The only thing missing is the actual modification of the pixel data, which is left up to derived filter classes. This is actually a very nice design because it enables you to create new image filters by deriving from ImageFilter and overriding only a few methods.
The ImageFilter class operates on an image using the color model defined by the image producer. The RGBImageFilter class, on the other hand, derives from ImageFilter and implements an image filter specific to the default RGB color model. RGBImageFilter provides the overhead necessary to process image data in a single method that converts pixels one at a time in the default RGB color model. This processing takes place in the default RGB color model regardless of the color model used by the image producer. Like ImageFilter, RGBImageFilter is meant to be used in conjunction with the FilteredImageSource image producer.
The seemingly strange thing about RGBImageFilter is that it is an abstract class, so you can't instantiate objects from it. It is abstract because of a single abstract method, filterRGB. The filterRGB method is used to convert a single input pixel to a single output pixel in the default RGB color model. filterRGB is the workhorse method that handles filtering the image data; each pixel in the image is sent through this method for processing. To create your own RGB image filters, all you must do is derive from RGBImageFilter and implement the filterRGB method. This is the technique you'll use a little later today when you implement your own image filters.
The RGBImageFilter class contains a member variable that is very important in determining how it processes image data: canFilterIndexColorModel. The canFilterIndexColorModel member variable is a boolean that specifies whether the filterRGB method can be used to filter the color map entries of an image using an index color model, rather than the individual pixels themselves. If this member variable is false, each pixel in the image is processed, similar to if it was using a direct color model.
The CropImageFilter class is derived from ImageFilter and provides a means of extracting a rectangular region within an image. Like ImageFilter, the CropImageFilter class is designed to be used with the FilteredImageSource image producer. You may be a little confused by CropImageFilter because it sounds a lot like the PixelGrabber class mentioned earlier. It is important to understand the differences between these two classes because they perform very different functions.
First, remember that PixelGrabber implements the ImageConsumer interface, so it functions as an image consumer. CropImageFilter, on the other hand, is an image filter. This means that PixelGrabber is used as a destination for image data, where CropImageFilter is applied to image data in transit. You use PixelGrabber to extract a region of an image to store in an array of pixels (the destination). You use CropImageFilter to extract a region of an image that is sent along to its destination (usually another Image object).
Writing Your Own Image Filters
Although the standard Java image filter classes are powerful as a framework, they aren't that exciting to work with by themselves. Image filters don't really get interesting until you start implementing your own. Fortunately, the Java classes make it very simple to write your own image filters.
All the image filters you'll develop in today's lesson are derived from RGBImageFilter, which enables you to filter images through a single method, filterRGB. It really is as easy as deriving your class from RGBImageFilter and implementing the filterRGB method. Let's give it a try!
A Color Image Filter
Probably the simplest image filter imaginable is one that filters out the individual color components (red, green, and blue) of an image. The ColorFilter class does exactly that. Listing 25.1 contains the source code for the ColorFilter class. It is located on the CD-ROM in the file ColorFilter.java.
Listing 25.1. The ColorFilter class.
 1: class ColorFilter extends RGBImageFilter {
 2:   boolean red, green, blue;
 3:
 4:   public ColorFilter(boolean r, boolean g, boolean b) {
 5:     red = r;
 6:     green = g;
 7:     blue = b;
 8:     canFilterIndexColorModel = true;
 9:   }
10:
11:   public int filterRGB(int x, int y, int rgb) {
12:     // Filter the colors
13:     int r = red ? 0: ((rgb >> 16) & 0xff);
14:     int g = green ? 0: ((rgb >> 8) & 0xff);
15:     int b = blue ? 0: ((rgb >> 0) & 0xff);
16:
17:     // Return the result
18:     return (rgb & 0xff000000) | (r << 16) | (g << 8) | (b << 0);
19:   }
20: }
| Analysis |
The ColorFilter class is derived from RGBImageFilter and contains three boolean member variables that determine which colors are to be filtered out of the image. These member variables are set by the parameters passed into the constructor. The member variable inherited from RGBImageFilter-canFilterIndexColorModel-is set to true to indicate that the color map entries can be filtered using filterRGB if the incoming image is using an index color model. |
Beyond the constructor, ColorFilter implements only one method, filterRGB, which is the abstract method defined in RGBImageFilter. filterRGB takes three parameters: the x and y position of the pixel within the image and the 32-bit (integer) color value. The only parameter you are concerned with is the color value, rgb.
Recalling that the default RGB color model places the red, green, and blue components in the lower 24 bits of the 32-bit color value, it is easy to extract each one by shifting out of the rgb parameter. These individual components are stored in the local variables r, g, and b. Notice, however, that each color component is shifted only if it is not being filtered. For filtered colors, the color component is set to 0.
The new color components are then shifted back into a 32-bit color value and returned from filterRGB. Notice that care is taken to ensure that the alpha component of the color value is not altered. The 0xff000000 mask takes care of this because the alpha component resides in the upper byte of the color value.
Congratulations! You've written your first image filter! You have two more to go before you plug them all into a test program.
An Alpha Image Filter
It isn't always apparent to programmers how the alpha value stored in the color value for each pixel affects an image. Remember that the alpha component specifies the transparency or opaqueness of a pixel. By altering the alpha values for an entire image, you can make it appear to fade in and out. This works because the alpha values range from totally transparent (invisible) to totally opaque.
The AlphaFilter class filters the alpha components of an image according to the alpha level you supply in its constructor. Listing 25.2 contains the source code for the AlphaFilter class. It is located on the CD-ROM in the file AlphaFilter.java.
Listing 25.2. The AlphaFilter class.
 1: class AlphaFilter extends RGBImageFilter {
 2:   int alphaLevel;
 3:
 4:   public AlphaFilter(int alpha) {
 5:     alphaLevel = alpha;
 6:     canFilterIndexColorModel = true;
 7:   }
 8:
 9:   public int filterRGB(int x, int y, int rgb) {
10:     // Adjust the alpha value
11:     int alpha = (rgb >> 24) & 0xff;
12:     alpha = (alpha * alphaLevel) / 255;
13:
14:     // Return the result
15:     return ((rgb & 0x00ffffff) | (alpha << 24));
16:   }
17: }
| Analysis |
The AlphaFilter class contains a single member variable, alphaLevel, that keeps up with the alpha level to be applied to the image. This member variable is initialized in the constructor, as is the canFilterIndexModel member variable. |
Similar to the ColorFilter class, the filterRGB method is the only other method implemented by AlphaFilter. The alpha component of the pixel is first extracted by shifting it into a local variable, alpha. This value is then scaled according to the alphaLevel member variable initialized in the constructor. The purpose of the scaling is to alter the alpha value based on its current value. If you were to set the alpha component to the alpha level, you wouldn't be taking into account the original alpha component value.
The new alpha component is shifted back into the pixel color value and the result returned from filterRGB. Notice that the red, green, and blue components are preserved by using the 0x00ffffff mask.
A Brightness Image Filter
So far the image filters you've seen have been pretty simple. The last one you create is a little more complex, but it acts as a more interesting filter. The BrightnessFilter class implements an image filter that brightens or darkens an image based on a brightness percentage you provide in the constructor. Listing 25.3 contains the source code for the BrightnessFilter class. It is located on the CD-ROM in the file BrightnessFilter.java.
Listing 25.3. The BrightnessFilter class.
 1: class BrightnessFilter extends RGBImageFilter {
 2:   int brightness;
 3:
 4:   public BrightnessFilter(int b) {
 5:     brightness = b;
 6:     canFilterIndexColorModel = true;
 7:   }
 8:
 9:   public int filterRGB(int x, int y, int rgb) {
10:     // Get the individual colors
11:     int r = (rgb >> 16) & 0xff;
12:     int g = (rgb >> 8) & 0xff;
13:     int b = (rgb >> 0) & 0xff;
14:
15:     // Calculate the brightness
16:     r += (brightness * r) / 100;
17:     g += (brightness * g) / 100;
18:     b += (brightness * b) / 100;
19:
20:     // Check the boundaries
21:     r = Math.min(Math.max(0, r), 255);
22:     g = Math.min(Math.max(0, g), 255);
23:     b = Math.min(Math.max(0, b), 255);
24:
25:     // Return the result
26:     return (rgb & 0xff000000) | (r << 16) | (g << 8) | (b << 0);
27:   }
28: }
| Analysis |
The BrightnessFilter class contains one member variable, brightness, that keeps track of the percentage to alter the brightness of the image. This member variable is set via the constructor, along with the canFilterIndexModel member variable. The brightness member variable can contain values in the range -100 to 100. A value of -100 means the image is darkened by 100 percent, and a value of 100 means the image is brightened by 100 percent. A value of 0 doesn't alter the brightness of the image at all. |
It should come as no surprise by now that filterRGB is the only other method implemented by BrightnessFilter. In filterRGB, the individual color components are first extracted into the local variables r, g, and b. The brightness effects are then calculated based on the brightness member variable. The new color components are then checked against the 0 and 255 boundaries and modified if necessary.
Finally, the new color components are shifted back into the pixel color value and returned from filterRGB. Hey, it's not that complicated after all!
Using Image Filters
You put in the time writing some of your own image filters, but you have yet to enjoy the fruit of your labors. It's time to plug the filters into a real Java applet and see how they work. Figure 25.6 shows the FilterTest applet busily at work filtering an image of a pear, quite literally the fruit of your labors!
Figure 25.6 : The FilterTest applet.
The FilterTest applet uses all three filters you've written to enable you to filter an image of a pear. The R, G, and B keys on the keyboard change the different colors filtered by the color filter. The left and right arrow keys modify the alpha level for the alpha filter. The up and down arrow keys alter the brightness percentage used by the brightness filter. Finally, the Home key restores the image to its unfiltered state.
Listing 25.4 contains the source code for the FilterTest
applet. The complete source code and executables for the FilterTest
applet are located on the accompanying
CD-ROM.
Listing 25.4. The FilterTest applet.
 1: public class FilterTest extends Applet {
 2:   Image     src, dst;
 3:   boolean   red, green, blue;
 4:   final int alphaMax = 9;
 5:   int       alphaLevel = alphaMax;
 6:   int       brightness;
 7:
 8:   public void init() {
 9:     src = getImage(getDocumentBase(), "Pear.gif");
10:     dst = src;
11:   }
12:
13:   public void paint(Graphics g) {
14:     g.drawImage(dst, 0, 0, this);
15:   }
16:
17:   public boolean keyDown(Event evt, int key) {
18:     switch (key) {
19:     case Event.HOME:
20:       red = false;
21:       green = false;
22:       blue = false;
23:       alphaLevel = alphaMax;
24:       brightness = 0;
25:       break;
26:     case Event.LEFT:
27:       if (--alphaLevel < 0)
28:         alphaLevel = 0;
29:       break;
30:     case Event.RIGHT:
31:       if (++alphaLevel > alphaMax)
32:         alphaLevel = alphaMax;
33:       break;
34:     case Event.UP:
35:       brightness = Math.min(brightness + 10, 100);
36:       break;
37:     case Event.DOWN:
38:       brightness = Math.max(-100, brightness - 10);
39:       break;
40:     case (int)'r':
41:     case (int)'R':
42:       red = !red;
43:       break;
44:     case (int)'g':
45:     case (int)'G':
46:       green = !green;
47:       break;
48:     case (int)'b':
49:     case (int)'B':
50:       blue = !blue;
51:       break;
52:     default:
53:       return false;
54:     }
55:     filterImage();
56:     return true;
57:   }
58:
59:   void filterImage() {
60:     dst = src;
61:
62:     // Apply the color filter
63:     dst = createImage(new FilteredImageSource(dst.getSource(),
64:       new ColorFilter(red, green, blue)));
65:
66:     // Apply the alpha filter
67:     dst = createImage(new FilteredImageSource(dst.getSource(),
68:       new AlphaFilter((alphaLevel * 255) / alphaMax)));
69:
70:     // Apply the brightness filter
71:     dst = createImage(new FilteredImageSource(dst.getSource(),
72:       new BrightnessFilter(brightness)));
73:
74:     // Redraw the image
75:     repaint();
76:   }
77: }
| Analysis |
The FilterTest applet class contains member variables for keeping up with the source and destination images, along with member variables for maintaining the various filter parameters. |
The first method implemented by FilterTest is init, which loads the image Pear.gif into the src member variable. It also initializes the dst member variable to the same image. The paint method is implemented next, and simply consists of a call to the drawImage method, which draws the destination (filtered) Image object.
The keyDown method is implemented to handle keyboard events generated by the user. In this case, the keys used to control the image filters are handled in the switch statement. The corresponding member variables are altered according to the keys pressed. Notice the call to the filterImage near the end of keyDown.
The filterImage method is where the actual filtering takes place; it applies each image filter to the image. The dst member variable is first initialized with the src member variable to restore the destination image to its original state. Each filter is then applied using a messy-looking call to createImage. The only parameter to createImage is an ImageProducer object. In this case, you create a FilteredImageSource object to pass into createImage. The constructor for FilteredImageSource takes two parameters: an image producer and an image filter. The first parameter is an ImageProducer object for the source image, which is obtained using the getSource method for the image. The second parameter is an ImageFilter-derived object.
The color filter is first applied to the image by creating a ColorFilter object using the three boolean color value member variables. The alpha filter is applied by creating an AlphaFilter object using the alphaLevel member variable. Rather than allowing 255 different alpha levels, the alpha level is normalized to provide only 10 different alpha levels. This is evident in the equation using alphaMax, which is set to 9. Finally, the brightness filter is applied by creating a BrightnessFilter object and passing in the brightness member variable.
Summary
Although the overall goal of today's lesson is to learn how to use image filters, you also covered a great deal of related material along the way. You first learned about color in general and then about the heart of advanced Java graphics: color models. With color models under your belt, you moved on to image filters. You saw how the Java image filter classes provide a powerful framework for working with images without worrying about unnecessary details. You finished up the lesson by writing three of your own image filters, along with an applet that put them to work filtering a real image.
You're now well versed in one of the more advanced areas of Java graphics programming. Just in case you're starting to burn out on all this graphics stuff, tomorrow's lesson shifts gears dramatically and introduces you to client/server network programming in Java.
Q&A
| If Java colors are inherently 32 bit, how does Java display color on systems using less than 32 bits to represent color? | |
| The reality is that there aren't a lot of computer systems out there equipped to fully support 32-bit color. For example, most high-end pcs and Macintoshes only support 24-bit color. Additionally, the average pc only supports 8-bit color. Java handles this internally by mapping 32-bit color values to the underlying system as efficiently as possible, sometimes by using an index color model. In some cases image quality will suffer because the full range of colors in the image can't be displayed. | |
| I still don't understand why there is an alpha component in Java colors. What's the deal? | |
| Strictly speaking, all that is required of Java to support a wide range of colors are the three primary color components: red, green, and blue. However, the alpha component adds the ability to alter the opaqueness of a color, which makes it much easier to implement graphics effects that alter the transparency properties of a color. | |
| Is there a situation in which I will ever need to implement my own color model? | |
| I'm hesitant to say that you'll never need to implement your own color model, but let me say that the situation in which you would need a custom color model is highly unlikely to occur. This is because color models are mainly an internal abstraction used by the Java graphics system itself. | |
| I understand why image filters are useful, but what exactly is the importance of image producers and consumers? | |
| Image producers and consumers provide a clean abstraction for the source and destination of raw image data. Without image producers and consumers, you would have to use a custom solution each time you wanted to get data from or write data to an image. By having the source and destination of image data clearly defined, more advanced graphics functions like image filters are much easier to work with. |